torch.save(model.state_dict(), 'E:\\model_only_par.pt') onnx_save_path = "E:\\model.onnx" example_tensor = torch.randn(1, 1, 512).to(device) torch.onnx.export(model, # model being run example_tensor, # model input (or a tuple for multiple inputs) onnx_save_path, verbose=False, # store the trained parameter weights inside the model file training=False, do_constant_folding=True, input_names=['input'], output_names=['output'] )
// Pointers to input and output device buffers to pass to engine. // Engine requires exactly IEngine::getNbBindings() number of buffers. assert(engine.getNbBindings() == 2); void* buffers[2] = { NULL,NULL };
// In order to bind the buffers, we need to know the names of the input and output tensors. // Note that indices are guaranteed to be less than IEngine::getNbBindings() //const int inputIndex = engine.getBindingIndex(INPUT_BLOB_NAME); //const int outputIndex = engine.getBindingIndex(OUTPUT_BLOB_NAME);
报错发现cuDNN少了cublasLt64_10.dll和Zlib(Zlib is a data compression software library that is needed by cuDNN) 遂下载并安装Zlib;在CUDA的bin文件夹下,有个cublasLt64_11.dll,我就copy了一份改名成cublasLt64_10.dll,就不报它的错了。 Add the directory path of zlibwapi.dll to the environment variable PATH. 但是还是报错,于是我直接把dll放进CUDA的bin中。 但还是错,我开始觉得是cuDNN版本的问题,于是把cuDNN版本从8.3.3换到了8.4.1,成功运行!
import torch,os from torch.utils.data import Dataset import pandas as pd import torch.nn as nn import torch.nn.functional as F import torch.optim as optim from torch.autograd import Variable
defload_data_from_folder(datasetPath): ims, labels, class_list = [], [], [] g = os.walk(r"E:\207Project\Data\HRRP") for path, dir_list, file_list in g: for dir_name in dir_list: class_list.append(dir_name) class_index = dict(zip(class_list, range(len(class_list)))) print("类别对应序号:") print(class_index) g = os.walk(r"E:\207Project\Data\HRRP") for path, dir_list, file_list in g: for file_name in file_list: if (file_name[file_name.rfind('.') + 1:] != "txt"): continue ims.append(os.path.join(path, file_name)) im_class = path[path.rfind('\\') + 1:] labels.append(int(class_index[im_class])) return ims, labels defgetTensorFromTXT(filePath): file_data=[] t=0 withopen(filePath, 'r') as f: for line in f.readlines(): if(t< 2): t+=1 continue a=line[line.rfind(" ")+1:-1] if(a!=""): file_data.append(float(a)) outtensor=torch.tensor(file_data) outtensor=(outtensor-min(outtensor)) / (max(outtensor) - min(outtensor)) outtensor = outtensor.reshape([1, 512]) return outtensor
deftest(model,device,test_loader): model.eval() correct=0#预测对了几个。 with torch.no_grad(): for idx,(t_data,t_target) inenumerate(test_loader): t_data,t_target=t_data.to(device),t_target.to(device) pred=model(t_data)#batch_size*2 pred_class=pred.argmax(dim=1)#batch_size*2->batch_size*1 correct+=pred_class.eq(t_target.view_as(pred_class)).sum().item() acc=correct/len(test_data) print("accuracy:{},average_loss:{}".format(acc,average_loss))
num_epochs=5 losses=[]
for epoch inrange(num_epochs): train(model,device,train_loader,optimizer,epoch,losses)
torch.save(model.state_dict(), 'E:\\model_only_par.pt') onnx_save_path = "E:\\model.onnx" example_tensor = torch.randn(1, 1, 512).to(device) torch.onnx.export(model, # model being run example_tensor, # model input (or a tuple for multiple inputs) onnx_save_path, verbose=False, # store the trained parameter weights inside the model file training=False, do_constant_folding=True, input_names=['input'], output_names=['output'] )
import torch,os from torch.utils.data import Dataset import pandas as pd import torch.nn as nn import torch.nn.functional as F import torch.optim as optim from torch.autograd import Variable
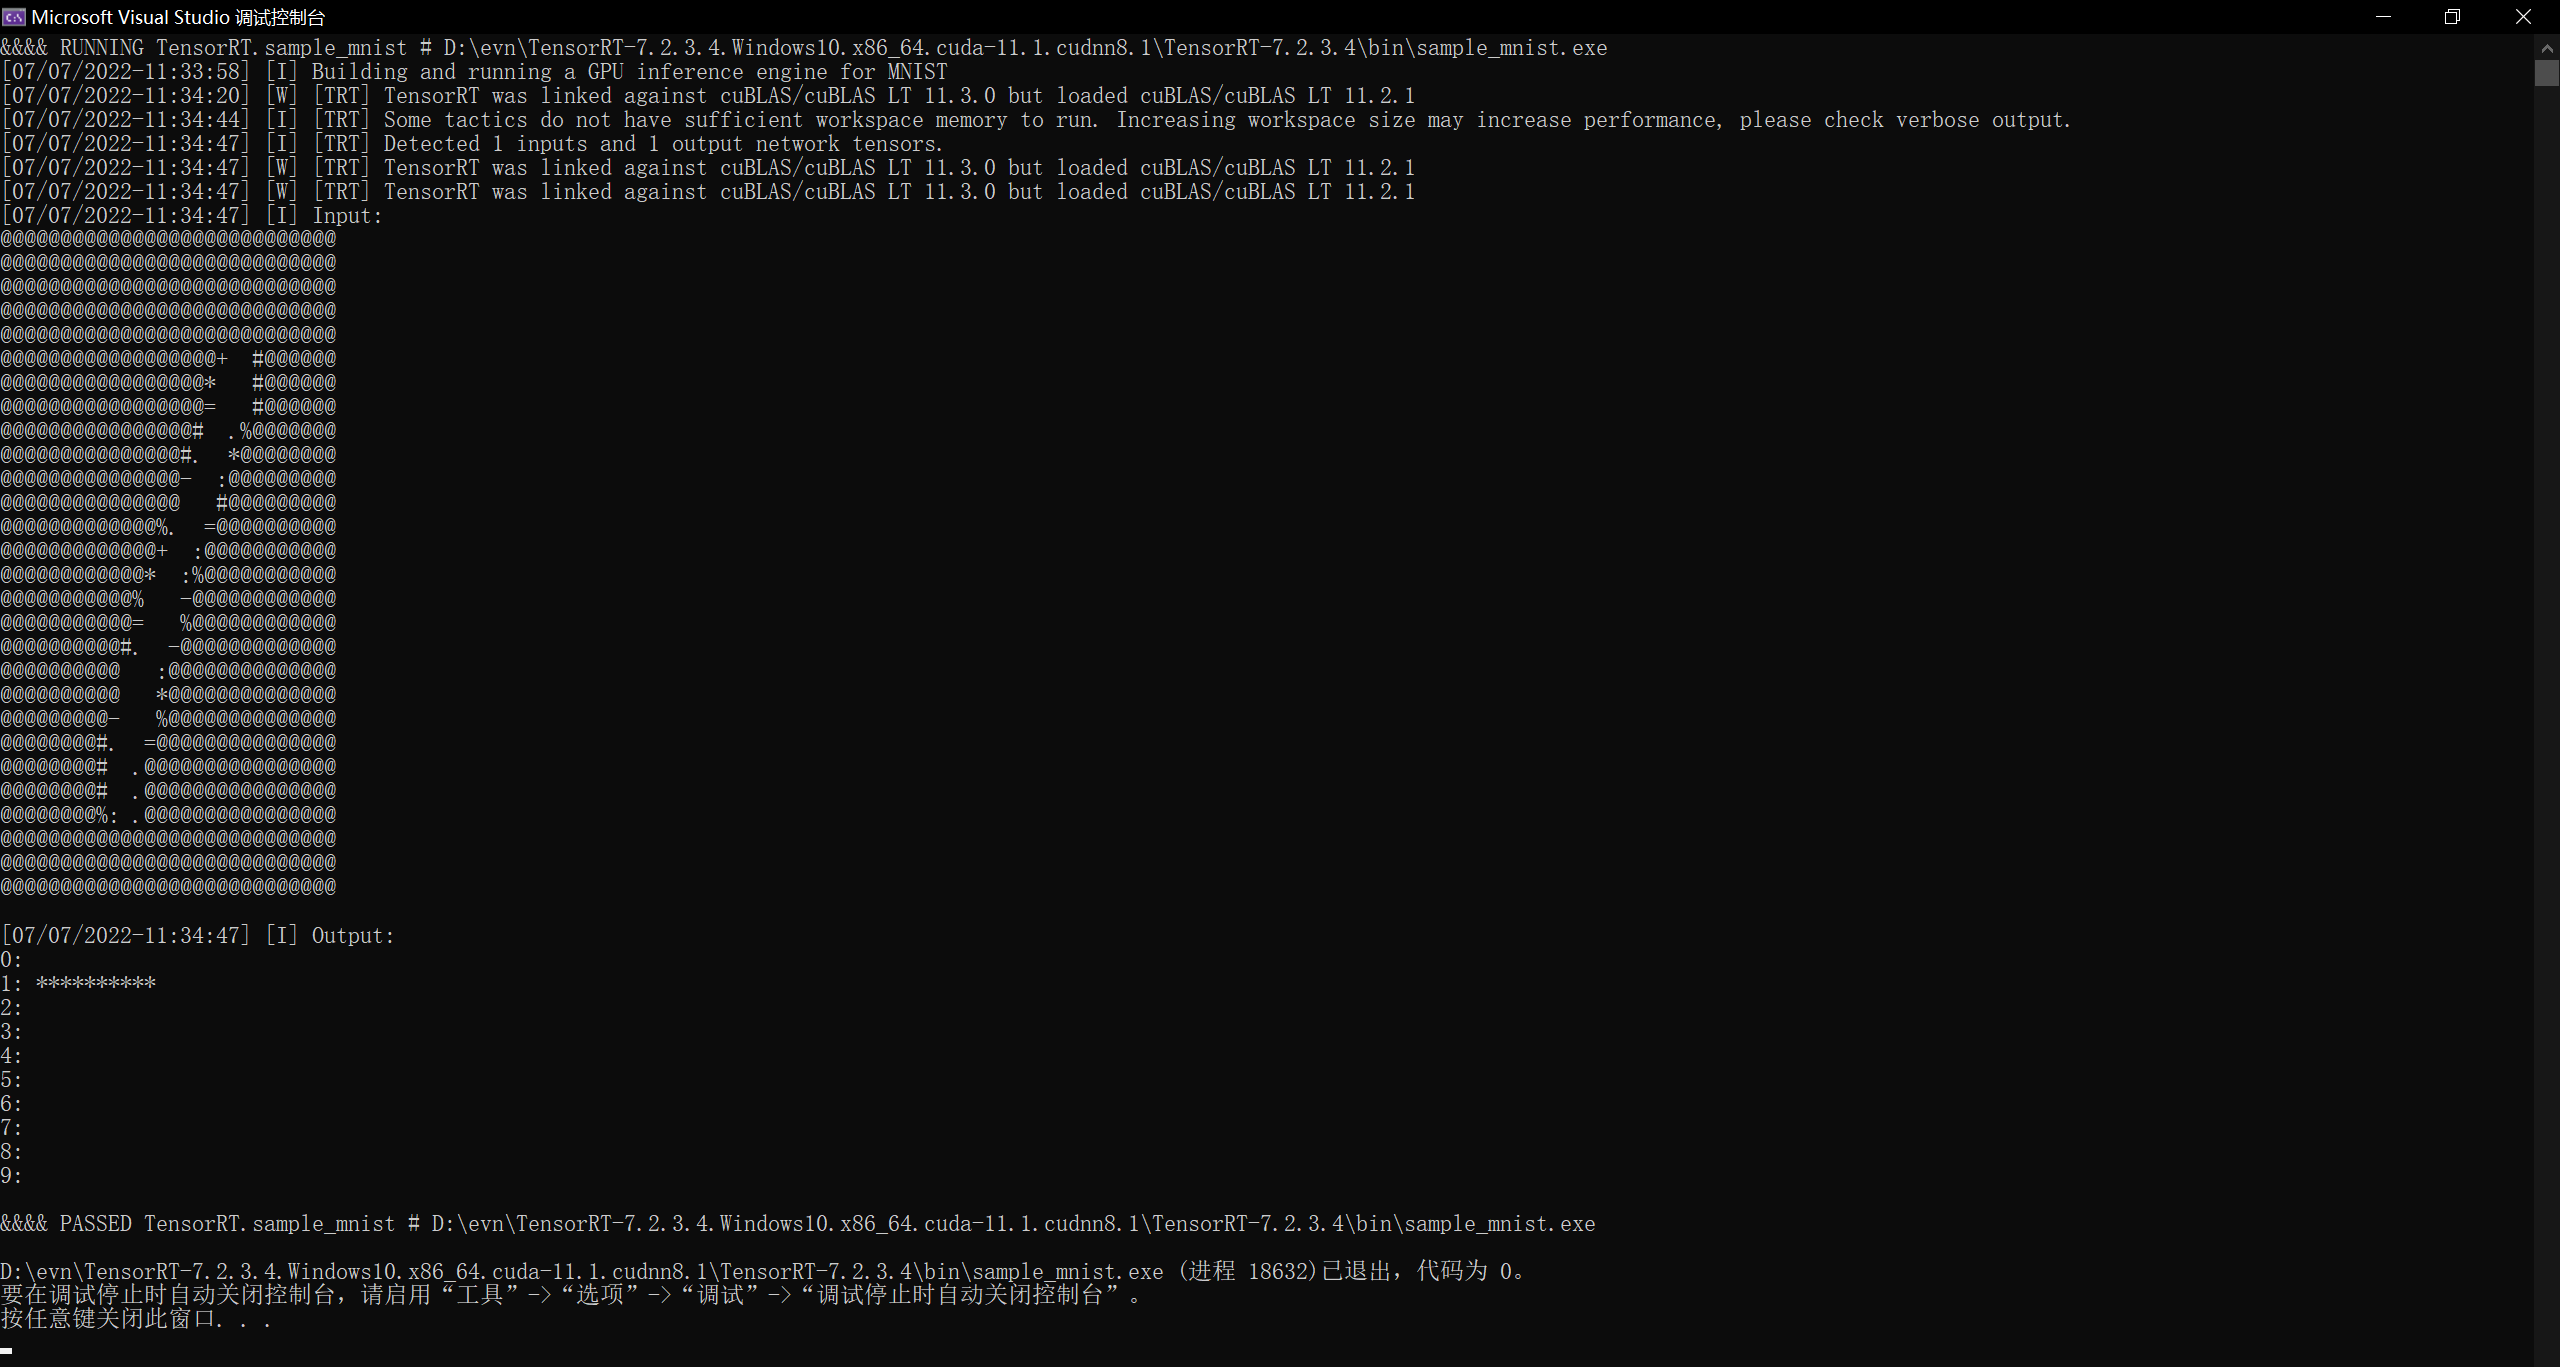
---------------------------------------------------------------- Input filename: E:/model.onnx ONNX IR version: 0.0.7 Opset version: 9 Producer name: pytorch Producer version: 1.10 Domain: Model version: 0 Doc string: ---------------------------------------------------------------- [07/09/2022-16:20:16] [W] [TRT] onnx2trt_utils.cpp:220: Your ONNX model has been generated with INT64 weights, while TensorRT does not natively support INT64. Attempting to cast down to INT32. tensorRT load onnx mnist model... [07/09/2022-16:20:17] [W] [TRT] TensorRT was linked against cuBLAS/cuBLAS LT 11.3.0 but loaded cuBLAS/cuBLAS LT 11.2.1 [07/09/2022-16:20:57] [W] [TRT] Try increasing the workspace size to 4194304 bytes to get better performance. [07/09/2022-16:21:07] [W] [TRT] Try increasing the workspace size to 4194304 bytes to get better performance. [07/09/2022-16:21:11] [W] [TRT] TensorRT was linked against cuBLAS/cuBLAS LT 11.3.0 but loaded cuBLAS/cuBLAS LT 11.2.1 [07/09/2022-16:21:11] [W] [TRT] TensorRT was linked against cuBLAS/cuBLAS LT 11.3.0 but loaded cuBLAS/cuBLAS LT 11.2.1 input_blob_name : input output_blob_name : output inputH : 1, inputW: 512 start to infer image... Inference Done.
---------------------------------------------------------------- Input filename: E:/model.onnx ONNX IR version: 0.0.7 Opset version: 13 Producer name: pytorch Producer version: 1.12.0 Domain: Model version: 0 Doc string: ---------------------------------------------------------------- [07/10/2022-18:26:03] [W] [TRT] onnx2trt_utils.cpp:220: Your ONNX model has been generated with INT64 weights, while TensorRT does not natively support INT64. Attempting to cast down to INT32. tensorRT load onnx mnist model... [07/10/2022-18:26:05] [W] [TRT] TensorRT was linked against cuBLAS/cuBLAS LT 11.3.0 but loaded cuBLAS/cuBLAS LT 11.2.1 [07/10/2022-18:27:00] [W] [TRT] TensorRT was linked against cuBLAS/cuBLAS LT 11.3.0 but loaded cuBLAS/cuBLAS LT 11.2.1 [07/10/2022-18:27:00] [W] [TRT] TensorRT was linked against cuBLAS/cuBLAS LT 11.3.0 but loaded cuBLAS/cuBLAS LT 11.2.1 input_blob_name : input output_blob_name : output inputH : 1, inputW: 512 start to infer image... Inference Done.
loading filename from:E:/model.trt length:4129238 load engine done deserializing [07/11/2022-14:23:37] [W] [TRT] TensorRT was linked against cuBLAS/cuBLAS LT 11.3.0 but loaded cuBLAS/cuBLAS LT 11.2.1 deserialize done The engine in TensorRT.cpp is not nullptr tensorRT engine created successfully. [07/11/2022-14:23:37] [W] [TRT] TensorRT was linked against cuBLAS/cuBLAS LT 11.3.0 but loaded cuBLAS/cuBLAS LT 11.2.1 start to infer Inference Done. time = 0.0018287 Output: -9.46875, -17.5312, -10.1875, -0.000114679, -21.8438,
#define CHECK(status) \ do\ {\ auto ret = (status);\ if (ret != 0)\ {\ std::cerr << "Cuda failure: " << ret << std::endl;\ abort();\ }\ } while (0)
// stuff we know about the network and the input/output blobs staticconstint INPUT_H = 1; staticconstint INPUT_W = 512; staticconstint OUTPUT_SIZE = 5;
// Load weights from files shared with TensorRT samples. // TensorRT weight files have a simple space delimited format: // [type] [size] <data x size in hex> voidgetTensorFromTXT(std::string data_path,float* y){ int r, n = 0; double d; FILE* f; float temp[1024]; f = fopen(data_path.c_str(), "r"); for (int i = 0; i < 2; i++) fscanf(f, "%*[^\n]%*c"); // 跳两行 for (int i = 0; i < 1024; i++) { r = fscanf(f, "%lf", &d); if (1 == r) temp[n++] = d; elseif (0 == r) fscanf(f, "%*c"); elsebreak; } fclose(f); for (int i = 0; i < 512; i++) { y[i] = temp[i*2 + 1]; }
std::vector<float> features; //临时特征向量 for (int d = 0; d < 512; ++d) features.push_back(y[d]); //特征归一化 float dMaxValue = *std::max_element(features.begin(), features.end()); //求最大值 float dMinValue = *std::min_element(features.begin(), features.end()); //求最小值 for (int f = 0; f < features.size(); ++f) { y[f] = (y[f] - dMinValue) / (dMaxValue - dMinValue + 1e-8); } features.clear();//删除容器 }
//// Pointers to input and output device buffers to pass to engine. //// Engine requires exactly IEngine::getNbBindings() number of buffers. //assert(engine.getNbBindings() == 2); void* buffers[2] = { NULL,NULL };
// In order to bind the buffers, we need to know the names of the input and output tensors. // Note that indices are guaranteed to be less than IEngine::getNbBindings() //const int inputIndex = engine.getBindingIndex(INPUT_BLOB_NAME); //const int outputIndex = engine.getBindingIndex(OUTPUT_BLOB_NAME);
#define CHECK(status) \ do\ {\ auto ret = (status);\ if (ret != 0)\ {\ std::cerr << "Cuda failure: " << ret << std::endl;\ abort();\ }\ } while (0)
// stuff we know about the network and the input/output blobs staticconstint INPUT_H = 1; staticconstint INPUT_W = 512; staticconstint OUTPUT_SIZE = 5;
//// Pointers to input and output device buffers to pass to engine. //// Engine requires exactly IEngine::getNbBindings() number of buffers. //assert(engine.getNbBindings() == 2); void* buffers[2] = { NULL,NULL };
// In order to bind the buffers, we need to know the names of the input and output tensors. // Note that indices are guaranteed to be less than IEngine::getNbBindings() CHECK(cudaMalloc(&buffers[0], batchSize * INPUT_H * INPUT_W * sizeof(float))); CHECK(cudaMalloc(&buffers[1], batchSize * OUTPUT_SIZE * sizeof(float))); /*for (int i = 0; i < batchSize * INPUT_H * INPUT_W; i++) { std::cout << input[i] << " "; }std::cout << std::endl<<"输出向量展示完毕"<<std::endl;*/ // Create stream cudaStream_t stream; CHECK(cudaStreamCreate(&stream)); // DMA input batch data to device, infer on the batch asynchronously, and DMA output back to host CHECK(cudaMemcpyAsync(buffers[0], input, batchSize * INPUT_H * INPUT_W * sizeof(float), cudaMemcpyHostToDevice, stream)); //开始推理 std::cout << "start to infer ..." << std::endl; context.enqueue(batchSize, buffers, stream, nullptr); CHECK(cudaMemcpyAsync(output, buffers[1], batchSize * OUTPUT_SIZE * sizeof(float), cudaMemcpyDeviceToHost, stream)); cudaStreamSynchronize(stream);
// Print histogram of the output distribution std::cout << "Output:\n"; for (unsignedint i = 0; i < 5; i++) { std::cout << prob[i] << ", "; } std::cout << std::endl;
// Destroy the engine context->destroy(); engine->destroy(); return0; }
#define CHECK(status) \ do\ {\ auto ret = (status);\ if (ret != 0)\ {\ std::cerr << "Cuda failure: " << ret << std::endl;\ abort();\ }\ } while (0)
usingnamespace nvinfer1;
static Logger gLogger;
intmain(int argc, char** argv) { nvinfer1::Dims mPredictionInputDims; //!< The dimensions of the input of the model. nvinfer1::Dims mPredictionOutputDims; //!< The dimensions of the output of the model.
IBuilder* builder = createInferBuilder(gLogger); //Creating the preprocessing network auto preprocessorNetwork = builder->createNetworkV2(1U << static_cast<int32_t>(NetworkDefinitionCreationFlag::kEXPLICIT_BATCH)); auto input = preprocessorNetwork->addInput("input", nvinfer1::DataType::kFLOAT, Dims4{ -1, 1, -1, -1 }); auto resizeLayer = preprocessorNetwork->addResize(*input); resizeLayer->setOutputDimensions(mPredictionInputDims); preprocessorNetwork->markOutput(*resizeLayer->getOutput(0)); //create an empty full-dims network, and parser nvinfer1::INetworkDefinition* network = builder->createNetworkV2(1U << static_cast<uint32_t>(NetworkDefinitionCreationFlag::kEXPLICIT_BATCH)); auto parser = nvonnxparser::createParser(*network, gLogger); //parse the model file to populate the network std::string onnx_filename = "E:/tfmodel_speciInput.onnx"; parser->parseFromFile(onnx_filename.c_str(), 2); for (int i = 0; i < parser->getNbErrors(); ++i) { std::cout << parser->getError(i)->desc() << std::endl; } printf("tensorRT load onnx model...\n");
没成功,报错:ERROR: An error occurred during the fetch of repository 'local_execution_config_python': 根据他的解决办法,是TensorFlow构建的问题,这个网页里提到的都要做到,下载缺少的MSYS2(我是缺少了这个)。(在捣鼓MSY32时,记得使用管理员权限)。其中在configure.py的时候,ROCm和CUDA不能同时选,否则有错。
PS D:\code\python\tensorflow\tensorflow> python ./configure.py You have bazel 6.0.0-pre.20220630.1 installed. Please specify the location of python. [Default is D:\evn\Python39\python.exe]:
Found possible Python library paths: D:\evn\Python39\lib\site-packages Please input the desired Python library path to use. Default is [D:\evn\Python39\lib\site-packages]
Do you wish to build TensorFlow with ROCm support? [y/N]: N No ROCm support will be enabled for TensorFlow.
Do you wish to build TensorFlow with CUDA support? [y/N]: y CUDA support will be enabled for TensorFlow.
Do you wish to build TensorFlow with TensorRT support? [y/N]: y TensorRT support will be enabled for TensorFlow.
WARNING: TensorRT support on Windows is experimental
Please specify a list of comma-separated CUDA compute capabilities you want to build with. You can find the compute capability of your device at: https://developer.nvidia.com/cuda-gpus. Each capability can be specified as "x.y" or "compute_xy" to include both virtual and binary GPU code, or as "sm_xy" to only include the binary code. Please note that each additional compute capability significantly increases your build time and binary size, and that TensorFlow only supports compute capabilities >= 3.5 [Default is: 3.5,7.0]:
Please specify optimization flags to use during compilation when bazel option "--config=opt" is specified [Default is /arch:AVX]:
Would you like to override eigen strong inline for some C++ compilation to reduce the compilation time? [Y/n]: Y Eigen strong inline overridden.
Would you like to interactively configure ./WORKSPACE for Android builds? [y/N]: N Not configuring the WORKSPACE for Android builds.
Preconfigured Bazel build configs. You can use any of the below by adding "--config=<>" to your build command. See .bazelrc for more details. --config=mkl # Build with MKL support. --config=mkl_aarch64 # Build with oneDNN and Compute Library for the Arm Architecture (ACL). --config=monolithic # Config for mostly static monolithic build. --config=numa # Build with NUMA support. --config=dynamic_kernels # (Experimental) Build kernels into separate shared objects. --config=v1 # Build with TensorFlow 1 API instead of TF 2 API. Preconfigured Bazel build configs to DISABLE default on features: --config=nogcp # Disable GCP support. --config=nonccl # Disable NVIDIA NCCL support. PS D:\code\python\tensorflow\tensorflow>
然后再执行 还是不行…..:
1 2 3 4 5 6 7 8 9 10 11
ERROR: An error occurred during the fetch of repository 'local_config_python': Traceback (most recent call last): File "D:/code/python/tensorflow/tensorflow/third_party/py/python_configure.bzl", line 271, column 40, in _python_autoconf_impl _create_local_python_repository(repository_ctx) File "D:/code/python/tensorflow/tensorflow/third_party/py/python_configure.bzl", line 213, column 33, in _create_local_python_repository python_lib = _get_python_lib(repository_ctx, python_bin) File "D:/code/python/tensorflow/tensorflow/third_party/py/python_configure.bzl", line 130, column 21, in _get_python_lib result = execute(repository_ctx, [python_bin, "-c", cmd]) File "D:/code/python/tensorflow/tensorflow/third_party/remote_config/common.bzl", line 230, column 13, in execute fail( Error in fail: Repository command failed
with tf.compat.v1.Session() as sess: withopen('saved_model/dense121/saved_model/saved_model.pb', 'rb') as f: graph_def = tf.compat.v1.GraphDef() graph_def.ParseFromString(f.read()) print (graph_def)
报错:
1 2
graph_def.ParseFromString(f.read()) google.protobuf.message.DecodeError: Error parsing message with type 'tensorflow.GraphDef'
defkeras_to_pb(model, output_filename, output_node_names): """ This is the function to convert the keras model to pb. Args: model: The keras model. output_filename: The output .pb file name. output_node_names: The output nodes of the network (if None, the function gets the last layer name as the output node). """ sess = tf.compat.v1.keras.backend.get_session() graph = sess.graph
with graph.as_default(): # Get names of input and output nodes. in_name = model.layers[0].get_output_at(0).name.split(':')[0]
if output_node_names isNone: output_node_names = [model.layers[-1].get_output_at(0).name.split(':')[0]]
defmain(args): # Disable eager execution in tensorflow 2 is required. tf.compat.v1.disable_eager_execution() # Set learning phase to Test. tf.compat.v1.keras.backend.set_learning_phase(0)
# load ResNet50 model pre-trained on imagenet model = tf.keras.applications.ResNet50( include_top=True, weights='imagenet', input_tensor=None, input_shape=None, pooling=None, classes=1000 )
# Convert keras ResNet50 model to .pb file in_tensor_name, out_tensor_names = keras_to_pb(model, args.output_pb_file, None) print(in_tensor_name) print(out_tensor_names) # # You can also use keras2onnx # onnx_model = keras2onnx.convert_keras(model, model.name, target_opset=11) # keras2onnx.save_model(onnx_model, "resnet.onnx")
[W] Dynamic dimensions required for input: input_1:0, but no shapes were provided. Automatically overriding shape to: 1x224x224x3 #这是因为Shapes参数处,输入节点的名字有错误,应该是input_1:0而不是input_1。直接和netron上显示的结点name保持一致即可
1 2
[E] [TRT] input_1:0: for dimension number 1 in profile 0 does not match network definition (got min=3, opt=3, max=3), expected min=opt=max=224). #Shapes参数1x3x224x224改成1x224x224x3即可
1 2 3 4
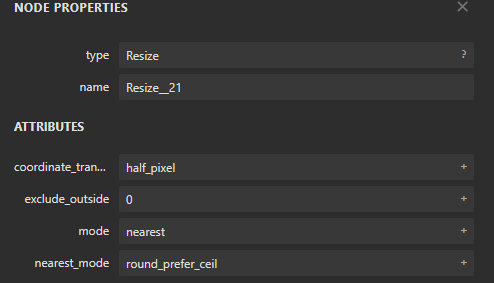
ERROR: builtin_op_importers.cpp:2593 In function importResize: [8] Assertion failed: (mode != "nearest" || nearest_mode == "floor") && "This version of TensorRT only supports floor nearest_mode!" [07/28/2022-12:54:39] [E] Failed to parse onnx file #模型中resize(nearest-ceil model)算子不支持
execute/enqueue are for implicit batch networks, and executeV2/enqueueV2 are for explicit batch networks. The V2 versions don’t take a batch_size argument since it’s taken from the explicit batch dimension of the network / or from the optimization profile if used.
In TensorRT 7, the ONNX parser requires that you create an explicit batch network, so you’ll have to use V2 methods.
// Run inference doInference(*context, input, prob, 1);
// Print histogram of the output distribution std::cout << "Output:\n"; for (unsignedint i = 0; i < 100; i++){ std::cout << prob[i] << ", "; } std::cout << std::endl;
// Destroy the engine context->destroy(); engine->destroy(); return0; }
""" USE DenseNet121""" OldModel = K.applications.DenseNet121(include_top=False,input_tensor=None,weights='imagenet') for layer in OldModel.layers[:149]: layer.trainable = False for layer in OldModel.layers[149:]: layer.trainable = True
model = K.models.Sequential()
"""a lambda layer that scales up the data to the correct size""" model.add(K.layers.Lambda(lambda x:K.backend.resize_images(x,height_factor=7,width_factor=7,data_format='channels_last')))
# Get frozen ConcreteFunction frozen_func = convert_variables_to_constants_v2(full_model) frozen_func.graph.as_graph_def()
layers = [op.name for op in frozen_func.graph.get_operations()] print("-" * 50) print("Frozen model layers: ") for layer in layers: print(layer)
print("-" * 50) print("Frozen model inputs: ") print(frozen_func.inputs) print("Frozen model outputs: ") print(frozen_func.outputs)
# Save frozen graph from frozen ConcreteFunction to hard drive tf.io.write_graph(graph_or_graph_def=frozen_func.graph, logdir="E:/", name="cifar10.pb", as_text=False) convert_h5to_pb()
#output -------------------------------------------------- Frozen model inputs: [<tf.Tensor 'Input:0' shape=(None, 32, 32, 3) dtype=float32>] Frozen model outputs: [<tf.Tensor 'Identity:0' shape=(None, 10) dtype=float32>]
---------------------------------------------------------------- Input filename: cifar10.onnx ONNX IR version: 0.0.6 Opset version: 11 Producer name: tf2onnx Producer version: 1.11.1 1915fb Domain: Model version: 0 Doc string: ---------------------------------------------------------------- [07/28/2022-12:54:39] [W] [TRT] onnx2trt_utils.cpp:220: Your ONNX model has been generated with INT64 weights, while TensorRT does not natively support INT64. Attempting to cast down to INT32. ERROR: builtin_op_importers.cpp:2593 In function importResize: [8] Assertion failed: (mode != "nearest" || nearest_mode == "floor") && "This version of TensorRT only supports floor nearest_mode!" [07/28/2022-12:54:39] [E] Failed to parse onnx file [07/28/2022-12:54:39] [E] Parsing model failed [07/28/2022-12:54:39] [E] Engine creation failed [07/28/2022-12:54:39] [E] Engine set up failed &&&& FAILED TensorRT.trtexec
这是因为目前TensorRt的BUG:#974 (comment),不支持resize_image。(不支持的还有NonZero op is not supported in TRT yet。)
代码里使用的keras.backend.resize_images这个方法使用的是 the nearest model + half_pixel + round_prefer_ceil,
[07/29/2022-17:25:34] [I] Host Latency [07/29/2022-17:25:34] [I] min: 1.82153 ms (end to end 2.79663 ms) [07/29/2022-17:25:34] [I] max: 7.05655 ms (end to end 13.8956 ms) [07/29/2022-17:25:34] [I] mean: 1.93649 ms (end to end 3.66704 ms) [07/29/2022-17:25:34] [I] median: 1.90527 ms (end to end 3.60721 ms) [07/29/2022-17:25:34] [I] percentile: 2.2793 ms at 99% (end to end 4.26883 ms at 99%) [07/29/2022-17:25:34] [I] throughput: 0 qps [07/29/2022-17:25:34] [I] walltime: 3.00986 s [07/29/2022-17:25:34] [I] Enqueue Time [07/29/2022-17:25:34] [I] min: 0.943115 ms [07/29/2022-17:25:34] [I] max: 1.9104 ms [07/29/2022-17:25:34] [I] median: 0.970215 ms [07/29/2022-17:25:34] [I] GPU Compute [07/29/2022-17:25:34] [I] min: 1.79199 ms [07/29/2022-17:25:34] [I] max: 7.01645 ms [07/29/2022-17:25:34] [I] mean: 1.89984 ms [07/29/2022-17:25:34] [I] median: 1.86963 ms [07/29/2022-17:25:34] [I] percentile: 2.24359 ms at 99% [07/29/2022-17:25:34] [I] total compute time: 2.96756 s &&&& PASSED TensorRT.trtexec # C:\Program Files\NVIDIA GPU Computing Toolkit\CUDA\v11.1\bin\trtexec.exe --onnx=cifar10.onnx --saveEngine=cifar10.trt --workspace=4096 --minShapes=Input:0:1x32x32x3 --optShapes=Input:0:1x32x32x3 --maxShapes=Input:0:50x32x32x3 --fp16
Could not load library cudnn_cnn_infer64_8.dll. Error code 1455 Please make sure cudnn_cnn_infer64_8.dll is in your library path! or context null 原因:内存不足,重启VS或者电脑就OK。
把学波保存的pb模型转为onnx时报错:ValueError: Input 0 of node save/AssignVariableOp was passed int32 from Variable:0 incompatible with expected resource.。把学波保存的ckpt读完转成pb,然后再转onnx一样报错。然后发现,读取pb中计算图结点名称这样的一个操作都不行,也报上面的错。而其他正常的.pb文件则不会。
1 2 3 4 5 6 7 8 9 10 11 12 13
#打印出pb文件中所有node的name  一般来说,opname[0]就是输出结点name,opname[-1]则是输出节点name。
import tensorflow.compat.v1 as tf
from tensorflow.python.platform import gfile

config = tf.ConfigProto()
sess = tf.Session(config=config)
with gfile.FastGFile(r'saved_model/dense121/pb_model/dense121_output100.pb', 'rb') as f:
    graph_def = tf.GraphDef()
    graph_def.ParseFromString(f.read())
    sess.graph.as_default()
    tf.import_graph_def(graph_def, name='')
    opname = [tensor.name for tensor in tf.get_default_graph().as_graph_def().node]
    print(opname)
原因分析:不是所有的graph都能冻结,可以冻结推理图但训练图不行,因为训练图除了执行变量读取外还有变量赋值。The error is saying that a node (likely a variable assignment node) was given a float (the frozen value of the variable) but was expecting a resource (the mutable variable).
----------------------------------------------------------------
Input filename:   dense121_6class.onnx
ONNX IR version:  0.0.6
Opset version:    11
Producer name:    tf2onnx
Producer version: 1.11.1 1915fb
Domain:
Model version:    0
Doc string:
----------------------------------------------------------------
[08/03/2022-17:53:29] [W] [TRT] onnx2trt_utils.cpp:220: Your ONNX model has been generated with INT64 weights, while TensorRT does not natively support INT64. Attempting to cast down to INT32.
[08/03/2022-17:53:30] [W] [TRT] TensorRT was linked against cuBLAS/cuBLAS LT 11.3.0 but loaded cuBLAS/cuBLAS LT 11.2.1
[08/03/2022-18:05:17] [I] [TRT] Detected 1 inputs and 1 output network tensors.
[08/03/2022-18:05:17] [W] [TRT] TensorRT was linked against cuBLAS/cuBLAS LT 11.3.0 but loaded cuBLAS/cuBLAS LT 11.2.1
[08/03/2022-18:05:17] [I] Engine built in 715.435 sec.

[08/03/2022-18:05:21] [I] Average on 10 runs - GPU latency: 1.61235 ms - Host latency: 1.65127 ms (end to end 3.09309 ms, enqueue 0.889355 ms)
[08/03/2022-18:05:21] [I] Average on 10 runs - GPU latency: 1.72634 ms - Host latency: 1.76223 ms (end to end 3.32732 ms, enqueue 0.8948 ms)
[08/03/2022-18:05:21] [I] Average on 10 runs - GPU latency: 1.61448 ms - Host latency: 1.65164 ms (end to end 3.10913 ms, enqueue 0.896533 ms)
[08/03/2022-18:05:21] [I] Average on 10 runs - GPU latency: 1.71921 ms - Host latency: 1.75725 ms (end to end 3.31399 ms, enqueue 0.932813 ms)
[08/03/2022-18:05:21] [I] Average on 10 runs - GPU latency: 1.61421 ms - Host latency: 1.64998 ms (end to end 3.10967 ms, enqueue 0.88999 ms)
[08/03/2022-18:05:21] [I] Host Latency
[08/03/2022-18:05:21] [I] min: 1.56018 ms (end to end 1.66077 ms)
[08/03/2022-18:05:21] [I] max: 2.76453 ms (end to end 4.55258 ms)
[08/03/2022-18:05:21] [I] mean: 1.72398 ms (end to end 3.229 ms)
[08/03/2022-18:05:21] [I] median: 1.65479 ms (end to end 3.11627 ms)
[08/03/2022-18:05:21] [I] percentile: 2.35864 ms at 99% (end to end 4.04886 ms at 99%)
[08/03/2022-18:05:21] [I] throughput: 0 qps
[08/03/2022-18:05:21] [I] walltime: 3.00615 s
[08/03/2022-18:05:21] [I] Enqueue Time
[08/03/2022-18:05:21] [I] min: 0.859131 ms
[08/03/2022-18:05:21] [I] max: 2.17993 ms
[08/03/2022-18:05:21] [I] median: 0.897461 ms
[08/03/2022-18:05:21] [I] GPU Compute
[08/03/2022-18:05:21] [I] min: 1.52576 ms
[08/03/2022-18:05:21] [I] max: 2.72894 ms
[08/03/2022-18:05:21] [I] mean: 1.68527 ms
[08/03/2022-18:05:21] [I] median: 1.61768 ms
[08/03/2022-18:05:21] [I] percentile: 2.32031 ms at 99%
[08/03/2022-18:05:21] [I] total compute time: 2.96102 s
&&&& PASSED TensorRT.trtexec # C:\Program Files\NVIDIA GPU Computing Toolkit\CUDA\v11.1\bin\trtexec.exe --onnx=dense121_6class.onnx --saveEngine=dense121_6class.trt --workspace=4096 --minShapes=Input:0:1x128x64x1 --optShapes=Input:0:1x128x64x1 --maxShapes=Input:0:100x128x64x1 --fp16